Audio Filters in Unity3D
A Short Introduction
I felt this article needed a bit of a background story, if you’re only here for the technical stuff feel free to skip ahead.
Games are an interactive medium, in which the player is delivered content based on his actions and input. This statement, while very superficial, ties the “interactivity” of our game directly to our ability as game developers to deliver content and while more interactive does not necessarily correlates to better game, it is a parameter we can use to roughly quantify the amount of content required in a game.
The relation between content and interactivity also highlights a problem – what happens when a game requires so much content that it is unfeasible to create it by hand? That problem has many solutions which constantly evolve in many domains. We use 3D models to allow our game world to be viewed from any angle, physical models to create unique interactions quickly, skeletal animations to reduce our animation creation time.
Will Wright’s Spore is a great example of a game that makes extensive use of technology to procedurally generate content for the player. Another great example is the use of NatualMotion’s Euphoria in GTA V to create a near infinite set of character animations. ( I’ve verified with some friends, I was not the only one who spent a substantial amount of time running into random objects in GTA V, only to see how the character would react )
With that thought in mind, I’ve decided to look into ways of making sound more interactive. At least to me it feels there’s much less information available on the subject of sound synthesis and procedural generation of audio content compared to other types of content. The end goal for me is to understand how to create sound that can be parameterized, and tied to game specific data, to create varying set of results based on the input.
The Interesting Stuff
I’m not planning on going into the details of digital sound theory, however, this article by Eduardo R. Miranda does an excellent job of covering it for the most part and I highly recommend reading it if you’re interested in the topic.
As the title suggests, this article will focus on modifying audio samples using audio filters in Unity3D. Before we get to creating audio filters, it’s important to understand how audio is processed in Unity, which sadly is not too well documented.
Unity uses FMOD middleware for audio processing, and provides some great out of the box audio filters and tools, additionally, it provides us with an interface for creating our own custom filters.
I’ve put together a flowchart mapping the audio process in Unity:
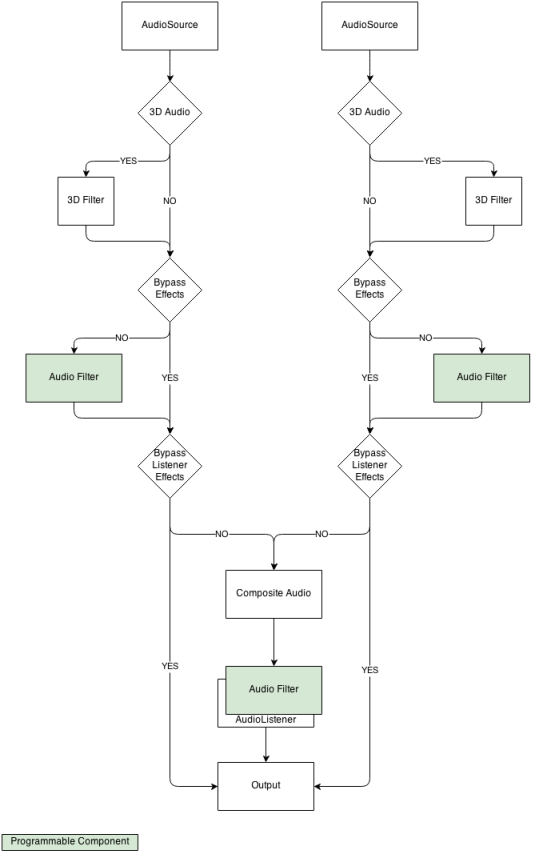
Unity’s audio process
As you can see, all audio originates from an AudioSource. If the audio sample is flagged as 3D audio, a filter will be applied that will adjust the left and right channels volume based on the position of the object in space, relative to the AudioListener object. Next the audio will pass through a series of filters ( the chart only shows one, however, if more than one filter is present data will flow through them in order ). The last step before outputting audio is passing it though the filters applied to the AudioListener.
You can read more on the built in audio filters in Unity on the manual page.
Programmable Filters
To create our own audio filter, we simply need to implement the method void OnAudioFilterRead( float[] data, int channels ) in a script attached to either an AudioSource or an AudioListener.
It’s important to note that this method is not invoked from the main thread like Update() or Start(), but from a separate audio thread, which means many Unity methods are not available from here. Additionally, since OnAudioFilterRead and Update both iterate at relatively high rates, you can safely assume they will be concurrent, which means you need to take extra care and make sure to use thread safe methods when working with data than is going to be accessed from both methods.
The first parameter is an array of the current audio sample, it is passed by reference and we can operate directly on the data.
The second parameter is the number of channels. Do note that stereo data is interleaved, which means samples alternate between left channel and right channel.
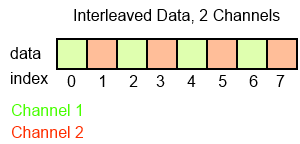
2 channel interleaved memory.
Here’s a simple filter I’ve put together which reduces the sample depth and flattens samples to create a more noisy / low-fi sound.
|
1 2 3 4 5 6 7 8 9 10 11 12 13 14 15 16 17 18 19 20 21 22 23 24 25 26 27 28 29 30 31 32 33 34 35 36 37 38 39 40 41 42 |
void OnAudioFilterRead( float[] data, int channels ) { if ( !filter ) { return; } float avgl, avgr; for ( int i = 0; i < data.Length - m_sampleRate * channels; i += m_sampleRate * channels ) { avgl = 0.0f; avgr = 0.0f; for ( int j = 0; j < m_sampleRate * channels; j += channels ) { avgl += data[ i + j ]; if ( channels > 1 ) { avgr += data[ i + j + 1 ]; } } avgl /= (float)m_sampleRate; avgr /= (float)m_sampleRate; avgl *= m_sampleDepth; avgl = Mathf.Round( avgl ); avgl /= m_sampleDepth; avgr *= m_sampleDepth; avgr = Mathf.Round( avgr ); avgr /= m_sampleDepth; for ( int j = 0; j < m_sampleRate * channels; j += channels ) { data[ i + j ] = avgl; data[ i + j + 1 ] = avgr; } } } |
In the case of this example, I’ve tied the two filter parameters to GUI elements, however, just as easily I could have bound them to game parameters such as player health for example, to create adaptive sound that changes based the game state.
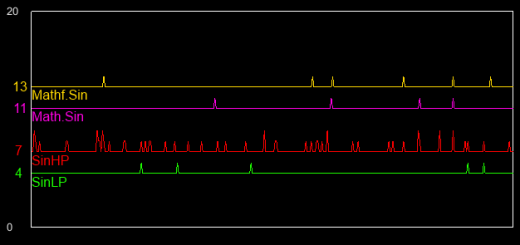
When the filter is active, we will see two new widgets in the script inspector. The first is graphic display of the left / right channels output level and the second is a timer which times the process execution with green or red background. A red background serves as a warning when the filter takes too long to execute.

Script inspector view with additional widgets visible when implementing audio filter method.
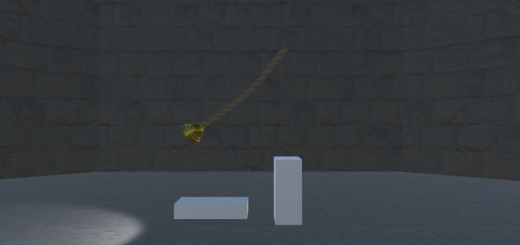
You can check out a web demo of the filter here. Also, if you’re interested in actual use cases, you can read this great article.
I’ve only touched the surface of procedural audio in this article, both because of the scope of the subject and the fact I’ve still got lots of learning to do myself as of writing this. But I do believe this article provides enough information to get started with procedural audio and Unity, from here on it’s more reading and more experimenting.
Links
1. Digital Sound Synthesis for Multimedia Audio, Eduardo R. Miranda
2. FMOD Website
3. Unity Manual – Audio Filters
5. Procedural Audio With Unity, Amaury La Burthe and Damien Hen